“The virtues of donations are great, because it helps the needy and at the same time it gives an opportunity to the donor to give the surplus to the people in need ” - Sama Veda

Search This Blog

Wednesday, June 24, 2015

VEGETABLE KARA KUZHAMBU


This is an aromatic and tasty kara kuzhambu without  onion and garlic, which can be mixed with rice and also served as a side dish for idli and dosas. Naattu karikaai, i.e., vegetables like broad beans, brinjal, ladysfinger, cluster beans, sweet potato, ash gourd, pumpkin, raw banana, potato, and colocassia are used for this kuzhambu. 

INGREDIENTS:

Mixed vegetables - 2 or 3 cups 

(any of the above said vegetables)
Tomato - 1
Tamarind - amla sized

Sambhar powder - 2 tsp.
Turmeric powder - a pinch
Hing - a generous pinch
Salt - to taste
Oil - 2 tsp.
Toor dhal - 1 tablespoon
Dry red chillies - 2 or 3

Black pepper - 1/8 tsp.
Scraped coconut - 1/2 cup

Black sesame seeds - 11/2 tsp. (dry roast)

To temper:
Gingelly oil - 1 tsp.
Mustard seeds - 1/2 tsp.
Fenugreek seeds - 1/4 tsp.
Curry leaves - 2 sprigs

METHOD:


Peel the skin of raw banana. If using colocassia, boil it separately and peel the skin. Chop all vegetables to medium-sized pieces. 

Soak tamarind in a cup of water and extract pulp.

In a kadai, dry roast sesame seeds until they splutter. Transfer to a plate. In the same kadai, add a spoon of oil and fry chillies, pepper and toor dhal until golden brown. Grind it alongwith roasted sesame seeds and scraped coconut to a fine powder.

Heat gingelly oil in the kadai, add the temperings and when they splutter add the chopped veggies, turmeric powder and hing. Saute for a minute, add a cup of water and cook it covered until half done. Now add the tamarind extract, sambhar powder and salt. Allow it to boil until the raw smell diffuses. Now add the ground powder, add water to get the desired consistency and allow it to boil until thick. Switch off the stove, add a spoon of gingelly oil to the kuzhambu and mix well. Tastes best when mixed with hot rice and a dollop of ghee. It can also be used as a side dish for idli, dosa and any south indian breakfast food.

Tuesday, June 23, 2015

MASALA PURI (COIMBATORE STYLE / KONGU STYLE)

HOW TO MAKE MASALA PURI, HOW TO MAKE MASALA PURI (COIMBATORE STYLE / KONGU STYLE)

After coming to Chennai, I missed the chaat from Coimbatore. The chat vendors in Coimbatore make distinct chaat varieties, especially Sasi kadai in Saibaba colony. The bhel puri and masala puri is served with a ragda gravy. So, I tried the same at home and it was so delicious and I am sharing this for the foodies out here and to those who miss Coimbatore chaats. In Coimbatore, masala puri chaat is very famous. Hot peas gravy is poured on top of mini puris and served. Do give a try. If you happen to visit Coimbatore, do not miss these chaats.

INGREDIENTS:


For gravy:
Dried white / green peas - 1 cup
Potato - 1 medium
Ginger paste - 1 tsp.
Coriander powder - 2 tsp.
Red chilli powder - 1/2 tsp.
Turmeric powder - 1/4 tsp.
Garam masala - 1 tsp.
Green chillies - 2
Salt - to taste


For Masala Puri:
Mini puris - 20
Onion - 1 (finely chopped, optional)
Tomato - 1 (finely chopped)
Chopped cilantro - 3 tablespoons.
Carrot - 1 (grated)
Sev - 1/2 cup


METHOD:


Soak dried green/white peas overnight. 

Cook potatoes separately and peel the skin. Mash lightly.

Pressure cook soaked peas alongwith salt and enough water for 3 whistles. Drain the water. Reserve a handful of cooked peas. Grind the remaining cooked peas to a coarse paste alongwith green chillies. Add all other ingredients, mix well add little water and cook until the raw smell diffuses. (I used ginger paste. If using garlic, ginger-garlic paste can be used instead of ginger paste). The gravy should be semi thick. Add water to get the desired consistency. Ragda gravy is ready.

HOW TO SERVE?:Place 5 or 6 puris in a plate. Crack a hole in the centre of the puris, stuff with little of the reserved cooked peas, pour the gravy on top of the puris. Top with grated carrot, and finely chopped tomatoes. If using onion, top with chopped onion also. Garnish with finely chopped cilantro and sev. Adding a dash of lemon juice is optional.

Thursday, June 11, 2015

GREEN PEPPERCORN PICKLE / PACHAI MILAGU OORUGAI

 GREEN PEPPERCORN PICKLE,PACHAI MILAGU OORUGAI,HOW TO MAKE GREEN PEPPERCORN PICKLE,HOW TO MAKE PACHAI MILAGU OORUGAI

Fresh green peppercorns are unriped peppercorns. These are available in market during season. 
Green peppercorns are popular in French, Thai, and Western European cuisine too. In addition to that, green peppercorns have numerous health benefits. They  aid digestion, and helps reduce acidity and many stomach ailments. They also help in fighting bacterial growth in the intestines. Green peppercorns are high in iron, vitamin K, and antioxidants. The  skin of the peppercorn is helpful in breaks down fat cells, and help in losing weight. The chemical 'piperine', found in it have anti-cancer properties as well. 

This is a traditional way of pickling fresh, raw peppercorns. This is an oil-free pickle. This has a good. strong flavour and very easy to make. 

INGREDIENTS:

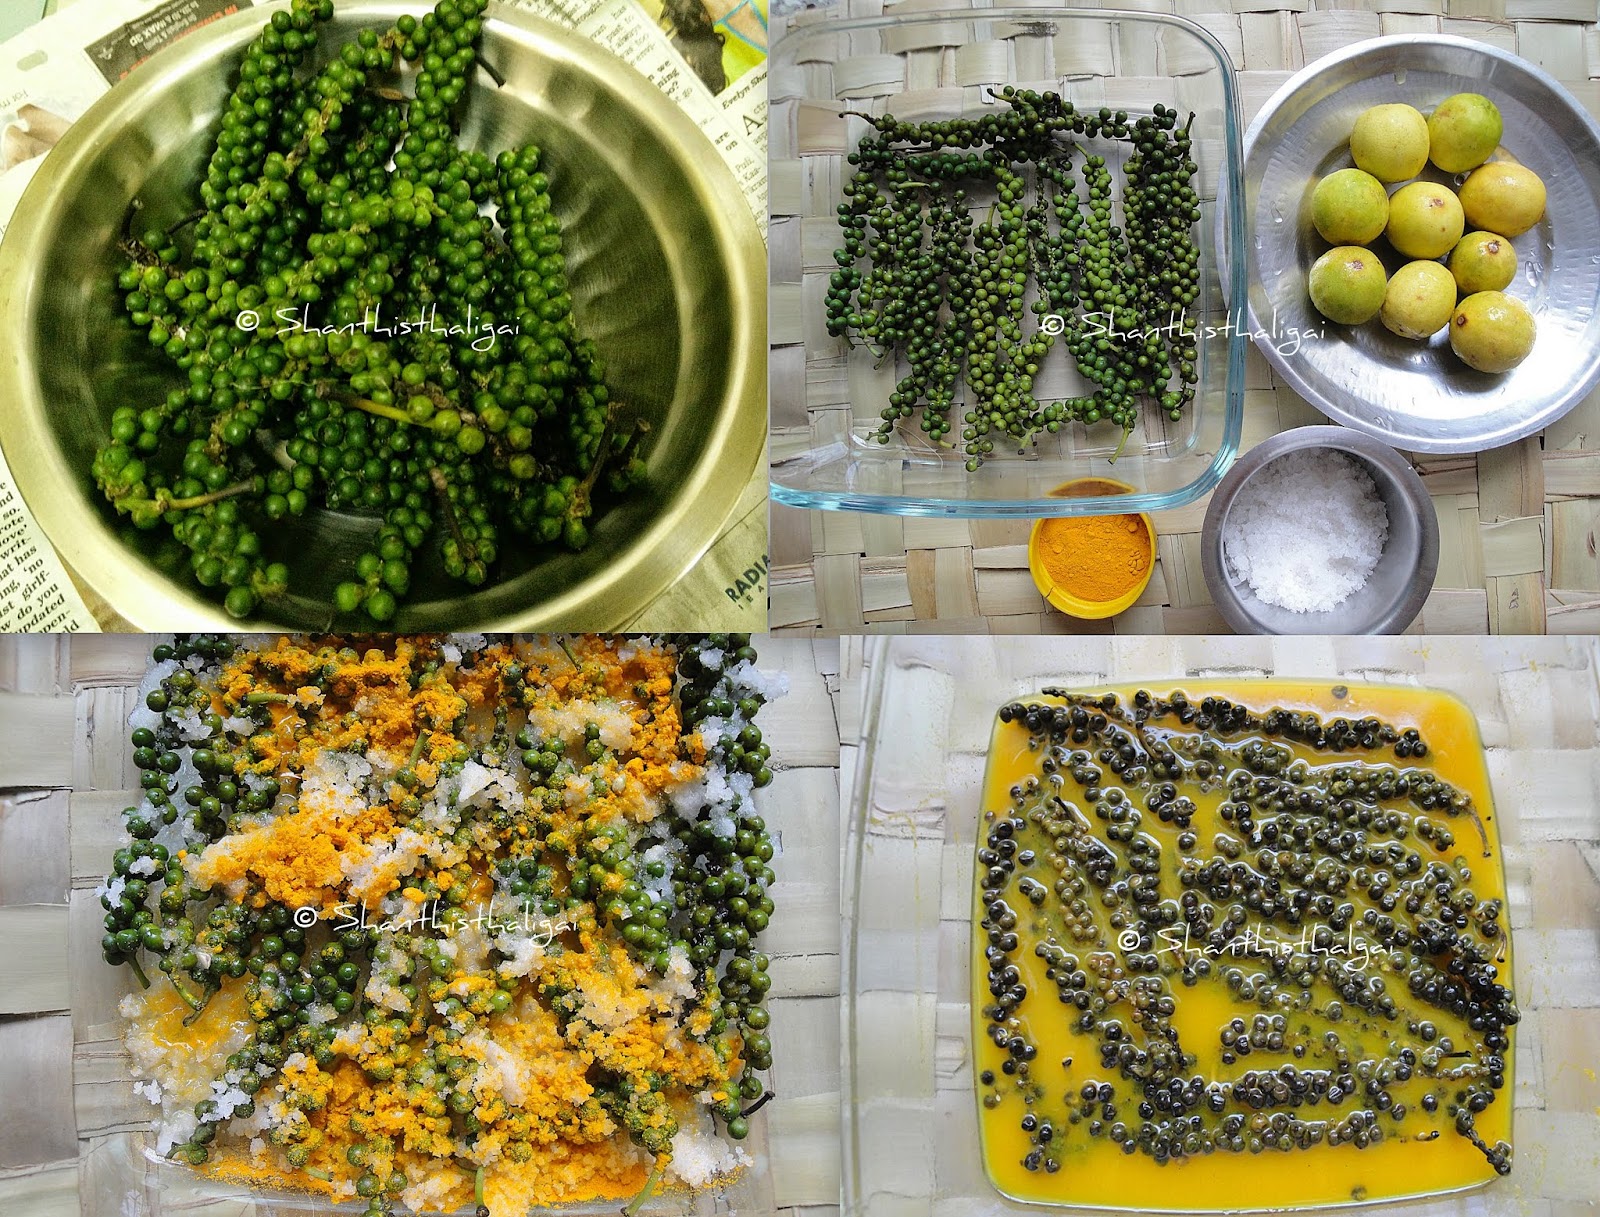
Fresh green peppercorns with stem - 100 gms
Sea salt - 1/2 cup
Lemon juice - 1 1/2 - 2 cups

Turmeric powder - 1/2 tsp

NOTE:
Buy firm, fresh and tightly stuck to the stem peppercorns.
DO NOT separate the peppercorns from the stem while pickling.

ENSURE THE PEPPERCORNS ARE FULLY IMMERSED IN THE BRINE SOLUTION.
Store in a glass or ceramic jar/bottle.
DO NOT keep this in a stainless steel or any metal utensil.
Ensure dry spoons while taking out the pickle.
The colour changes to black when not fully immersed in lime and salt solution. No worries, it is edible. 

GREEN PEPPERCORN PICKLE,PACHAI MILAGU OORUGAI,HOW TO MAKE GREEN PEPPERCORN PICKLE,HOW TO MAKE PACHAI MILAGU OORUGAI

METHOD:

Wash the peppercorns well and pat dry with a cloth. Allow it to dry completely. Powder the salt in a mixie.

Take a dry wide mouthed glass or ceramic bowl. I used a square borosil bowl with lid. Layer the bottom with salt, then place the peppercorns and add turmeric powder and salt . Repeat the process with layers of peppercorns, salt and turmeric powder. Pour the lemon juice . 
ENSURE THE PEPPERCORNS ARE FULLY IMMERSED IN THE LIME JUICE. This prevents the pickle from blackening. Close with an airtight lid. Mix well daily. Each time when you mix, ensure the peppercorns are immersed in thebrine solution. Within a week, the colour of the peppercorn will turn to a translucent and mild, light green colour. Hot, spicy and brined peppercorn pickle is ready to eat. Tastes best with curd rice.

It can be preserved for a year, when refrigerated. The same solution, if in excess, can be used for the next batch of green peppercorn pickle. The pickle, though ready to eat in 4 or 5 days, tastes awesome day by day.

Tuesday, June 9, 2015

AKKI ROTI (MALNAD STYLE) / SOFT RICE ROTI / TANDLACHI BHAKRI / ARI PATHIRI

HOW TO MAKE AKKI ROTI MALNAD STYLE,HOW TO MAKE MALNAD AKKI ROTI, HOW TO MAKE SOFT RICE ROTI ,HOW TO MAKE TANDLACHI BHAKRI , HOW TO MAKE ARI PATHIRI

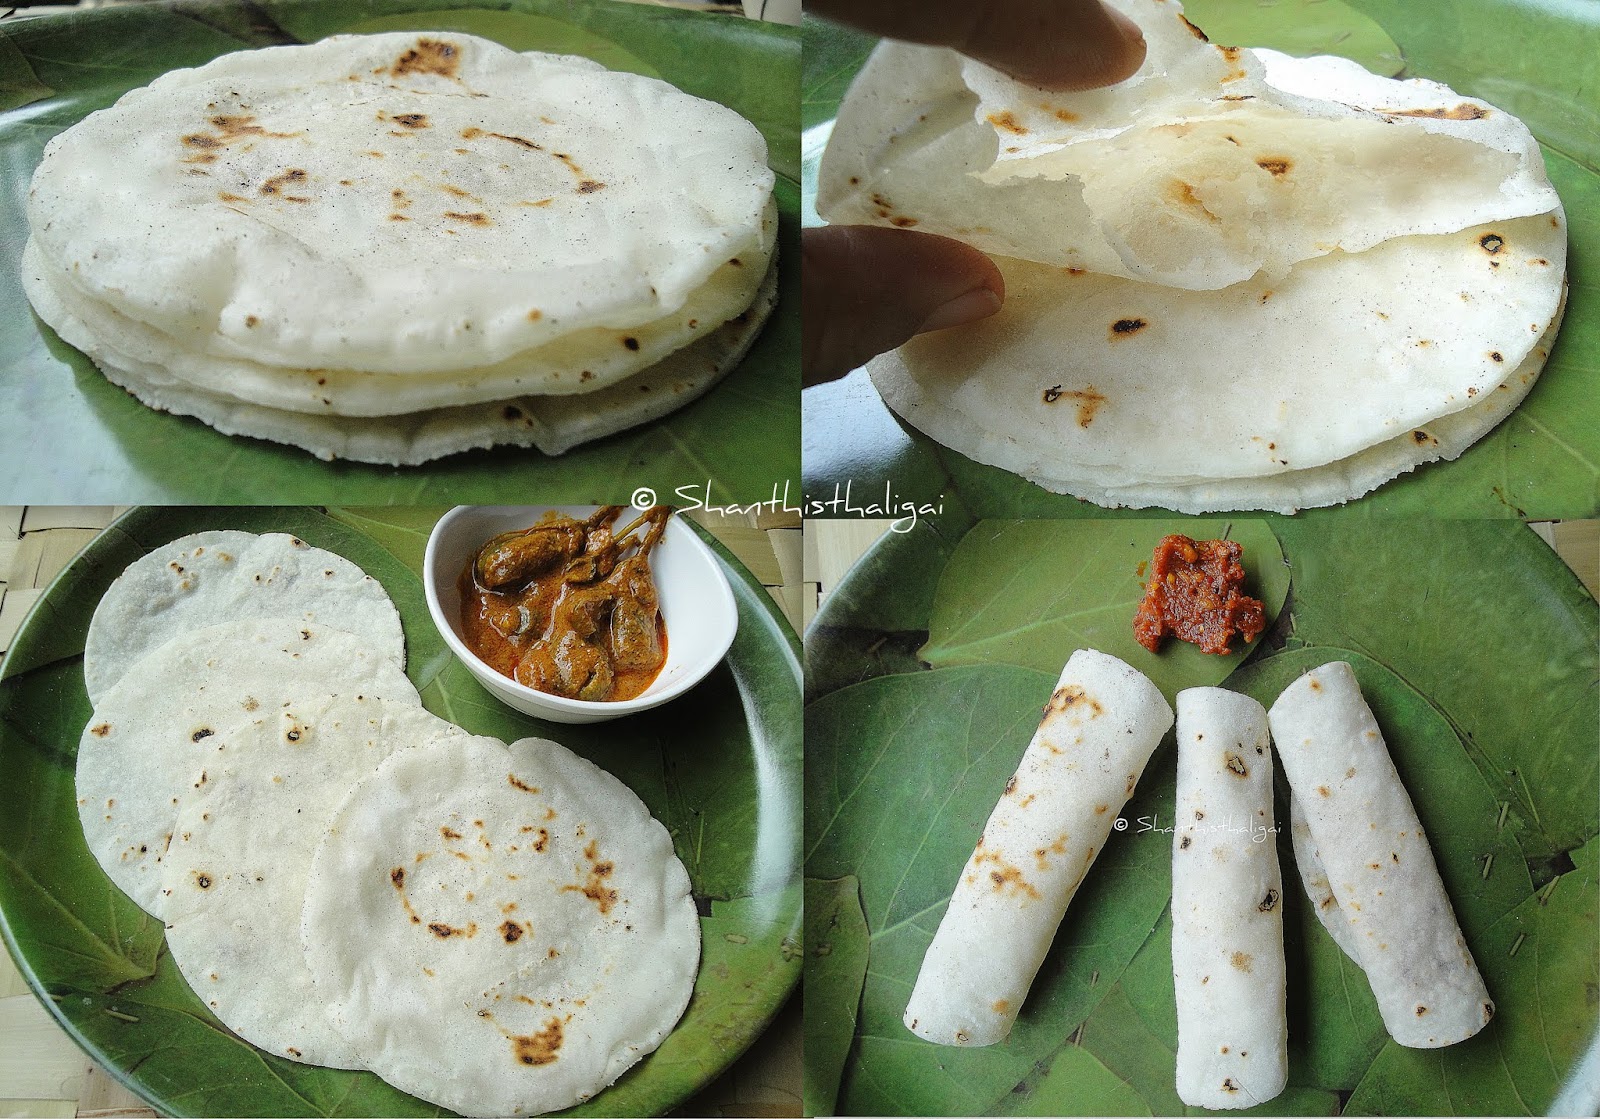
Akki roti / Rice roti is a unique breakfast of Karnataka. It is called as Tandlachi Bhakri in Maharashtra. It is popular in Kerala and called as Pathiri or Ari pathiri. The white rice roti with beautiful brown spots in it goes well with any spicy accompaniment like enne badanekai (ennai kathirikkai) and spicy tomato chutney. This is a soft and beautifully layered version of akki roti , which is easy to make. I will post another version of akki roti after sometime. 

INGREDIENTS:

Rice flour - 1 cup (Make rice flour as said here)
(Store bought rice flour can also be used.)
Water  - 1 cup
Salt - to taste (I used little less than 1/4 tsp.) 
Oil - 1 tsp.

HOW TO MAKE AKKI ROTI, HOW TO MAKE SOFT RICE ROTI ,HOW TO MAKE TANDLACHI BHAKRI , HOW TO MAKE ARI PATHIRI

HOW TO MAKE AKKI ROTI, HOW TO MAKE SOFT RICE ROTI ,HOW TO MAKE TANDLACHI BHAKRI , HOW TO MAKE ARI PATHIRI

  HOW TO MAKE AKKI ROTI, HOW TO MAKE SOFT RICE ROTI ,HOW TO MAKE TANDLACHI BHAKRI , HOW TO MAKE ARI PATHIRI

HOW TO MAKE AKKI ROTI, HOW TO MAKE SOFT RICE ROTI ,HOW TO MAKE TANDLACHI BHAKRI , HOW TO MAKE ARI PATHIRI

HOW TO MAKE AKKI ROTI, HOW TO MAKE SOFT RICE ROTI ,HOW TO MAKE TANDLACHI BHAKRI , HOW TO MAKE ARI PATHIRI

METHOD:

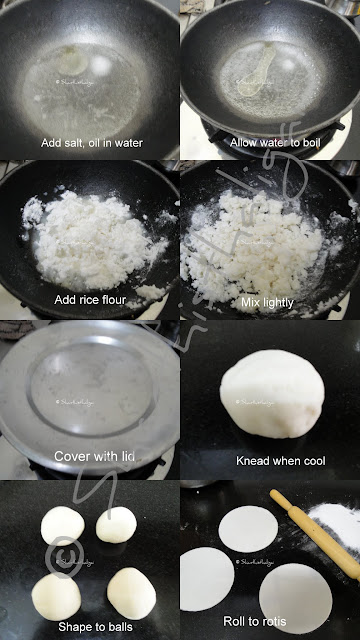
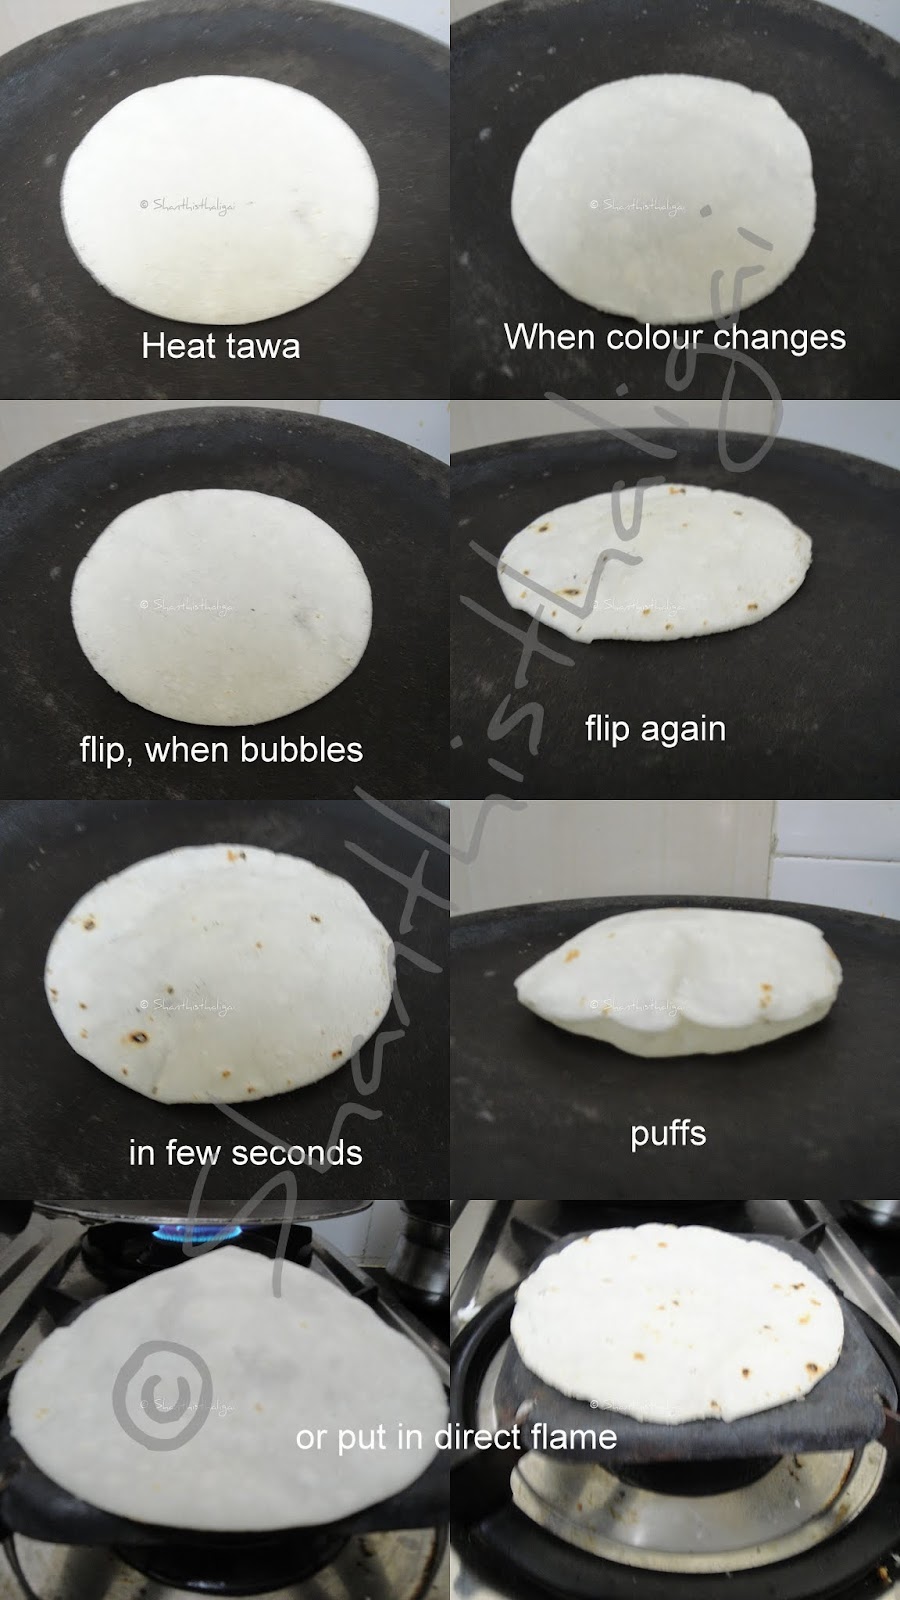
The pictures are self explanatory. For detailed recipe scroll down.
HOW TO MAKE AKKI ROTI, HOW TO MAKE SOFT RICE ROTI ,HOW TO MAKE TANDLACHI BHAKRI , HOW TO MAKE ARI PATHIRI


HOW TO MAKE AKKI ROTI, HOW TO MAKE SOFT RICE ROTI ,HOW TO MAKE TANDLACHI BHAKRI , HOW TO MAKE ARI PATHIRI

Heat water in a pan, add salt and oil.  When it comes to a rolling boil, simmer the stove, add the rice flour, mix slightly with a fork, switch off the stove, cover and keep aside for 10-15 minutes. When warm enough to handle, coat the hands with oil and knead to a soft, non-sticky dough. Divide the dough into equal-sized balls. Dust the balls with rice flour. Roll the balls to thin rotis with a rolling pin. If the dough is perfect, you will be able to roll without split edges. However, do not worry about the split edges, you can cut with a lid. 

Heat a tawa, place the roti, when the colour changes slightly, flip it to the other side. When  you see small bubbles, flip again and slightly press with the spatula or cloth. It will puff up beautifully. Alternatively, when you see small bubbles, take out using the tongs and put the first side down on direct medium flame.  

Super soft akki roti is ready. Serve hot with spicy enne badanekai ( ennai kathirikai) or spread spicy tomato thokku on the roti, roll and serve. 

NOTE: No need to drizzle oil on sides. This is soft even when cool, but at its best when served hot.

Friday, June 5, 2015

CHAPATHI / PHULKA

CHAPATHI, PHULKA, HOW TO MAKE PHULKA
CHAPATHI, PHULKA,HOW TO MAKE PHULKA

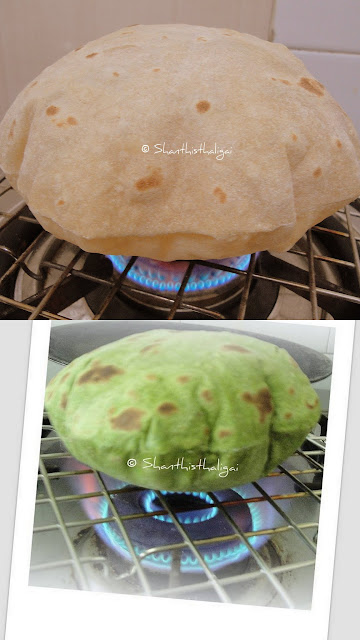
Chapathis are cooked on a tawa, whereas  phulka is partly cooked in tawa and  put on direct high flame. Many find it difficult to make and these simple steps can guide  you to make chapathis and phulkas.

INGREDIENTS:

Whole wheat atta- 4 cups
Salt- 1/2 tsp.
Water

METHOD:

For chapathis:

Take an easy to knead bowl, put in the atta and salt, add water little by little and mix it to a medium-soft dough. Knead well with your palm and fist it till soft. Keep aside for 20-30 minutes.

Make small balls out of the dough. Take a ball, dust it with a little flour(atta), and roll it out to a chapati. Meanwhile, heat a skillet and when hot, place the rolled chapathi on it. When the colour changes slightly, turn it to the other side. When you see small bubbles forming on this side , turn it again. Allow it to raise by pressing it gently with a clean towel. When cooked take it out from the skillet and brush it with ghee. Serve hot.

For phulkas: Heat a skillet and when hot, place the rolled chapathi on it. When the colour changes slightly, flip it to the other side. When you see small bubbles forming on this side, take out using the tongs and put the first side down on the roti grill which is placed on direct high flame OR you can put it directly on open flame using the tongs. It puffs up beautifully, no need to roast the other side, but you can if u wish to. 

Thursday, June 4, 2015

CARROT GINGER SOUP

CARROT GINGER SOUP, CARROT AND GINGER SOUP, HOW TO MAKE CARROT GINGER SOUP

This is an easy to make, healthy soup, which helps to improve appetite. It has a pleasing and excellent orange colour, and the flavour of ginger merges wonderfully with carrots.

INGREDIENTS:


Carrots - 4 medium sized
Ginger - 1" piece
Garlic - 1 pod (optional)
Butter - 2 tablespoons
Black pepper powder - to taste
Salt - to taste
Coriander leaves / Mint leaves - to garnish


METHOD:

Peel carrots and ginger. If using garlic peel that too. ( I didn't use ). Roughly chop the ginger. Add a cup of water to the carrot and ginger. Pressure cook for 2 whistles. When cool, puree in a mixie alongwith salt.

Melt butter in a pan, add the puree, add water to get the desired consistency and reheat it in medium flame until hot. Add pepper powder and stir well. Switch off the flame. Add little butter, garnish with coriander leaves or mint leaves. Serve piping hot.